Friday, April 11, 2014

How To: Urban Decay Electric Palette

So you are on the fence about purchasing the new Urban Decay Electric palette? Or maybe you bought it but you aren't quite sure what else to do with it besides rainbows? Yeah, I feel ya! When I first got this palette, and if I am honest with myself, BEFORE I bought this palette I said to myself, ya know, I don't need this but the colors are gorgeous and It would be fun to play with. I say play with because I am not a big color person, I stick to my neutrals for the daylight, and I am a bit of a homebody so I don't get to actually go out into the night like a true vampire very often. Now that I have the palette and have spent time with it I can honestly say that it serves many purposes. Urban Decay recently released a photo showing you what you can do with this palette, but they have master MUA's under their belt. I am just the average consumer, so let me show you what you can do with it.

Now the above picture is quite funny, but it also sheds light on what people really feel this palette is all about. YES, the colors are absolutely insane, but they are also unexpectedly versatile.Color whores die for this palette because it gives Sugarpill a run for their money, in a good way. When you think of bold colors, there really is only one market for that right now and that is Sugarpill. In a world where Urban Decay is only known for their fabulous cult of Naked palettes it shows that something safe can also be wild. I'm sure they weren't really thinking of that when they released it, because UD has always been about the bold and brash, but the Electric palette packs a bit of a proverbial punch. Which is: you love your neutrals, you are safe with your neutrals, but it is good to stand out sometimes, its good to get out of your routine, to try something new, to be bold, to kick ass, to be confident, and to shine. That is sort of what I am getting from this palette, which probably sounds incredibly stupid, but that's just how I feel, so deal with it lol I wear neutrals everyday because not only is it easy and I have perfected it, but because its safe, I look professional, I feel good about myself, and it works with whatever outfit I have planned. However, it's important to keep in mind that this palette is more than its neon rainbow, and it is quite versatile.

You can use this palette to add some fun color to your hair. I have tried it using Savage, Jilted, and Chaos and it worked beautifully. I have now applied the colors to wet hair, then hair sprayed it on then blow dried and totally dry and each time the results were epic. I like that its completely safe, does not stain my clothes/hair/hands, and it washes out with my next shampooing. It's all the fun, with none of the expense nor commitment. 

As UD has expressed, you can also paint little works of art on your body, or use the colors to fill in tattoos that have lost their vibrancy. Literally anything involving painting, you can do with this palette.

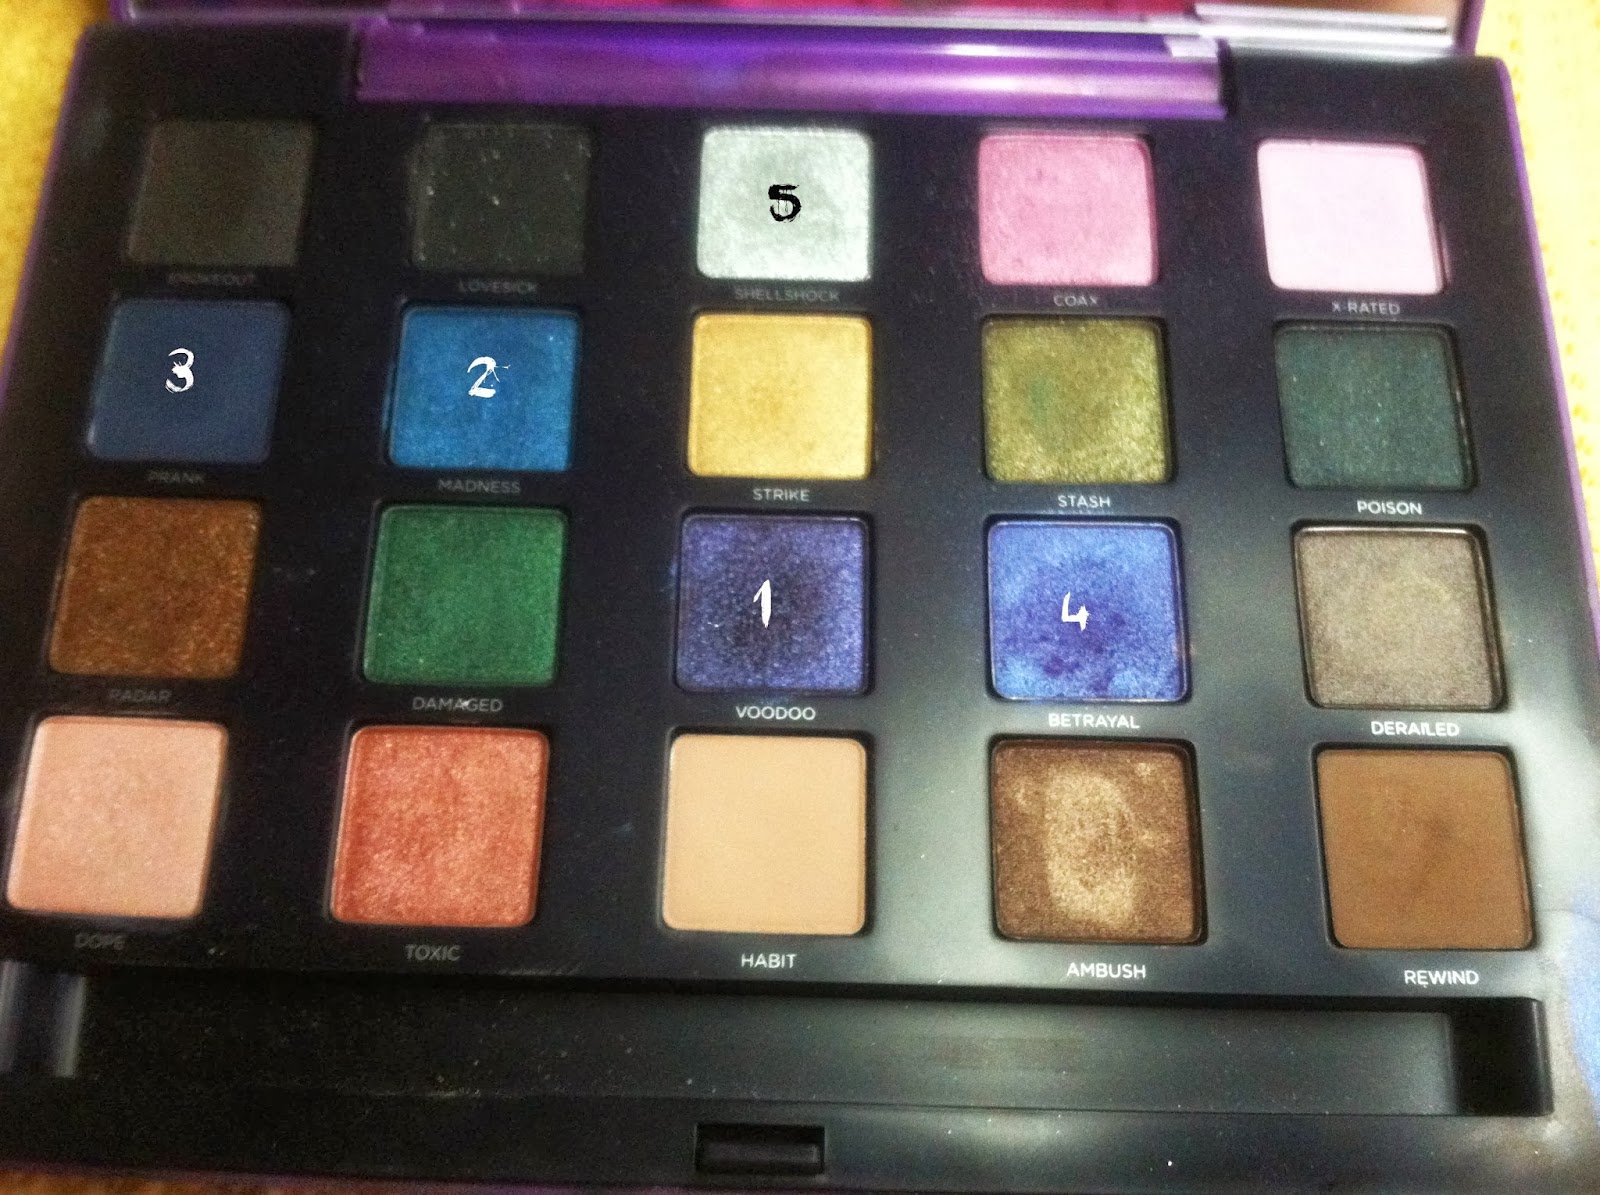
You of course can use any of these colors and release your inner unicorn. Although a few of these colors are not recommended for the eye area, I have used them all on my eyelid/brow and have not had any problems. I've also made a lipstick out of chaos (the bright ass blue).

To neutralize the colors, apply with a soft hand and blend out well. Today, I applied a neutral bronze/brown/gold look to my eyelids and added dimension to the crease by blending out Jilted. It really added a small pop of color, but is only noticeable if you are up in my face (which no one is :( ). I also used Revolt (the super shimmery silver) for my inner corners and it highlights quite well without being like a disco ball. It is truly all about using a light hand and not packing on the colors (unless you want too). If you dip your brush in once you have enough color on there for your entire lid, so lightly dabbing just the end of a brush is enough to do both your eyes for a softer/neutral look. 

I encourage you all to branch out and to try new things. No, you do not have to buy this palette to branch out, but getting out of your comfort zone is good for you sometimes. This is advice I will definitely need to follow, because I tend to play it safe. 

Go forth and kick ass!!!

* Using the Urban Decay Electric Palette (Jilted, Revolt, and HAIR) and the Too Faced Chocolate Bar Palette *


Wednesday, April 9, 2014

Urban Decay Electric Palette

 
What up everyone! I am officially back from my amazing month long vacation to my home state (Florida). I got to hang out by the pool, and laugh with my best friend for the entire month so I am extremely blessed. I am back at it like a crack addict though, because you know no amount of vacation can curb the addiction that is makeup!

While I was in Florida, Urban Decay finally released the highly anticipated (by me) Electric Palette. I put it on hold for a week, and finally caved and ordered it after I started seeing all the amazing reviews from my favorite beauty gurus. I love bright colors, but I tend to play it safe with my everyday makeup routine. I am one of those people that keeps to herself and doesn't like to necessarily stand out. I mean yeah, stand out because I look fresh to death and my makeup is on point, not because I have neon hair and makeup looking like I just came from the circus (clownolas know what I'm talking about!!!). I envy personas like Queen of Blending, Shrinkle (owner of Sugarpill), and drag queens all over the world for being themselves and embracing their life of color and in yo face style. I, however, love to play with color, but am a closet color lover because I don't want people staring at me, or coming up to me asking me where I go this and that. I am an introvert to the core. That is why I was skeptical to even ordering this because I felt like when would I ever actually use this other than to screw around in my free time. But boy was I wrong. After actually using this palette (I used all of it in my look below) I now know that I was just being a scaredy cat. Yes, these colors can be in yo face bright hot damn neon sunshine overload but they can also be soft and add just the right amount of color to your everyday makeup. It's all about the amount applied, and the amount of blending. The brightest neons in all the land can be toned down, trust me!

When you open this palette it is like a choir of angels starts to sing because it is so pretty that it had to have originated from Heaven, right? Well, Urban Decay is pretty much Heaven so it works! They never disappoint with their palettes and this is just so fantastic I cannot even tell you enough.
Top Row L to R: Revolt, Gonzo, Slowburn, Savage, and Fringe
Bottom Row L to R: Chaos, Jilted, Urban, Freak, and Thrash

I swatches these colors first so I could get a good feel for them before I put them all on my eyelids. All of these colors are absolutely fantastic, and the pigmentation is insane, like always. There are a few that apply more powdery than others (Savage (the pink), and Chaos (the neon blue) were incredibly powdery swatched) But that is because they are mattes, and mattes are usually that way. The ones that have a bit of shimmer or are more of a satin are velvety like other shadows UD is known for.

Overall, I love this palette! I highly recommend you visit your local Ulta and get your fingers in it ASAP. I plan on doing a few looks over the next couple weeks showing how to make it work for everyday subdued looks. So stay tuned :)

 *All photos have not been edited, or re touched to show true color vibrancy*


Wednesday, March 19, 2014

Too Faced A La Mode Eye Palette Swatches & First Impressions


Here are the initial swatches and first impressions for the new Too Faced A La Mode eye palette. I want some time to do a comprehensive review, but you know I just had to whip it out and get a feel for it.

The packaging is super cute and the eye shadows are held in a cute little tin. The palette is roughly the size of my iphone, but the palette is a little wider. The palette itself is 9 eye shadows, and the little booklet that comes with the palette stresses: 3 steps, 3 looks, 3 minutes. I will definitely be timing it in my more in depth review.


First impressions after doing the swatches is that the colors are totally gorgeous. Their are mattes, pearls, and shimmers, so it is a perfect variety. I also love that there a neutrals and brights so you have plenty to work with. When swatching the colors I noticed that a few of the colors (the mattes) were a bit chalky, while the pearls and shimmers felt like velvet. It's a bit unfortunate that the darkest/brightest colors are the mattes because there is a bit of a skip in them.

First row L to R: St. Tropez, Cannes, and Soleil
Second row L to R: Riviera, Jardin, and Cote d' Azur
Third row L to R: La Croisette, Monaco,  and De La Mer

After the swatches I definitely noticed which colors stand out to me. All the neutrals are just amazing, and the mattes (pink/navy) are sub par swatched. I have no idea how they will apply to the eye, so I will update you guys when I do a more in depth review.

Until next time... <3

-Sam

Sunday, March 16, 2014

Pinch Me Anyway... St. Patrick's Day Makeup Looks

Happy St. Patrick's Day!! I am a sucker for any sort of holiday, even those that I have no business celebrating. In America we over commercialize every holiday, and St. Patty's is under no exception. I'm not Irish at all, not even 1/8 Irish, but St. Patrick's Day is about religion and a priest, not leprechauns, green beer, and corned beef and cabbage.

Let me just drop some history on y'all right quick. St. Patrick wasn't even Irish, he was born in Britain, was later sold into slavery and brought to Ireland. He later became a priest after spending many years hiding away in a monastery. He is coined with establishing a religious system in Rome and starting the Christian Church in Ireland. He did not rid Ireland of snakes, nor did he hang with leprechauns, in fact the official color of St. Patrick's day is actually blue, not green. Literally everything associated with St. Patrick's Day started in America, and has absolutely nothing to do with the name-sake of the holiday or country of Ireland.

Hope I didn't bore you too much with that knowledge bomb but some things need to be said. Regardless, I love St. Patrick's Day in America because my favorite color is green, I love rainbows, leprechauns, green beer, and corned beef and cabbage. So any excuse to paint my eyeballs green, throw on some green and gold beads and get Irish wasted is pretty much right up my alley.

I kept my look simple because I will be out in public for the day, and I don't want people staring at me any more than usual. I did however think of drawing a pot of gold on one lid and doing some sort of rainbow mask type thing to connect my eyes, but in the end I said to myself : Keep it simple, yo!

SHOW ME THE MAKEUP YA BONY LASS


I primed my lids with Too Faced Candlelight eye-primer and patted on Nymph by Dark Heart Designs. In the crease I used Fairytale by Dark Heart Designs. To highlight my inner corner, I used Dark Heart Designs eye shadow in Jadis. I applied foundation (Benefit Hello Flawless), Bronzer (Too Faced Chocolate Soleil), and Dark Heart Designs Blush in Summertime Sadness.For the Brows I used Anastasia DipBrow in Blonde. I then curled my lashes, and used Kat Von D Mascara. My lips are Dark Heart Designs Sophia Lipstick with Urban Decay Honey Pot Gloss over top to boost the shine.


To boost your look, I recommend contouring your cheek bones, forehead (near hairline), jawline, and sides of your nose and highlighting your forehead, bridge of the nose, cupids bow, tops of your cheeks and chin. All I do to contour is use bronzer. For the highlight I use Girl Meets Pearl by Benefit and Anna Sui Mystic Rose.


To finish off the look, make sure you wear your favorite green ensemble, and accessorize with mardi gras beads. Voila, you're ready to drink green beer with the best of them.

As a bonus, my best friend Alexis let me do her makeup, which was nice because I need to practice on other people's faces. It is so hard to do other people's makeup by the way, unless their face is the same face as yours lol

I used all Dark Heart Designs products for hers as well. I need more practice, but it was so nice of her to let me draw on her for a while. Thanks boo!


Until next time, be safe, have fun, and taste the rainbow!

<3


Thursday, March 13, 2014

Rimmel Show Off Lip Lacquer Swatches & Review

I am a sucker for a good lip. Other than brows, I think a good lip can really make or break a look. For that reason, I horde lip products like no other. I probably own 500 lipsticks/glosses/balms, in fact I collect them for some odd reason. I received two of these Rimmel lip lacquers as a prize from an Influenster badge I completed. If you aren't sure what Influenster is, to sum it up = you do surveys and reviews, and the company sends you products for free to review and post about. The more in depth your reviews, the more you can qualify for something called a voxbox which contains a bunch of freebies. Every so often a brand will offer brand prizes which means if you complete everything that's asked, they will send you a box full of product. It's awesome, and if you would like to join shoot me a message on my fb page and I can send you an invite.

TO THE REVIEW BATMAN!

After I swatched the two I received as a prize, I immediately (IMMEDIATELY) went to Walgreens and bought every single one that I liked at first glance, which is all but 2 of them lol So today we are going to be reviewing 10 of these babies. I bought so many because they were all 50% off so it only cost me roughly $2.50 per tube, which is insane in the membrane.


Left to Right: Celestial, Big Bang, Stargazer, Nude Eclipse, Luna, Nova, Out of This World, Galaxy, Apocaliptic, and Stellar
One of the best things about these babies is the brush. It is kind of oddly shaped, but it allows you to draw your lips on to perfection. I noticed that it was so precise that I could even outline my lips like a lip liner, and then fill them in with no problems. I don't own a lip wand that is like this, but I really liked it a lot.

Top Row: Celestial, Big Bang, Stargazer, Nude Eclipse, Luna
Bottom Row: Nova, Out of This World, Galaxy, Apocaliptic, and Stellar

As you can see from the initial swatches, the product is thick and it is very pigmented. Remember, I got these for $2.50 each and even at their normal price of less than 5$ a piece, that is insane. I have some lipstick from benefit, mac, and tarte, and even urban decay that don't swatch as nicely as this. You can probably tell now why I got in the car and hauled to Walgreens so quickly!! There are other colors, but they just didn't look like something I would ever wear. These colors are ones at first glance that I liked without being able to swatch or test them. 8/10 were purchased from my own pocket, and all swatches were done without the help of a primer or liner.

ALL OF THESE LIPPIES ARE NON STICKY, SMELL LIKE WATERMELON, AND ALL BUT ONE HAVE EXCELLENT PIGMENTATION

SHOW ME THE GOODS


Celestial is a dusty rose, mauve pink color. It is absolutely gorgeous, and I can see myself wearing this everyday because it is pretty close to my natural lip color.Out of all of the colors I got this is one of my favorites.

Big Bang is definitely a great name for this lipstick. It is a loud, in yo face kind of red. It looks a bit darker in the tube, but with my skin tone it is a bright red/orange neon. I tend to go for more blue toned red than orange toned, but I actually really like this. The pigmentation is insane, and it feels so good on your lips. If you are into bright colors, this is a great red for you to have in your arsenal.

Stargazer is one of those colors that you see in the tube and are fascinated with but when you put it on your lips you realize that you look straight up ridiculous lol Out of all of them, it is my least favorite and the pigmentation is just not there. I think that on a darker skin tone this color would be fabulous, but for me it looks like goldmember.

Nude Eclipse is a really pretty soft golden/beige nude. I am not a big fan of golden nudes, but this is actually workable with my skin tone. Fair toned skin doesn't look great with a golden lip because it washes out your face, however, I don't think that this color is awful with my skin tone. 

Luna is one of those colors that I really don't know if I like. I don't do many orange colors for the same reasons above (skin tone issues), but I think this would be a really pretty color for summer. It's bright, but not too loud, and if you apply less it would be a nice peachy nude. It's different, but in a good way.

Nova is gorgeous. It's a muted pink, and its similar to celestial, but a little more opaque. I like it because it is just a few shades lighter than my actual lip color, so it blends really well. I really like this color, and I will wear this often. Its a perfect pink. 

Out of This World is a soft pink color with a bit of a shimmer built into it. The next color, Galaxy is basically the same color but just a tad bit darker. When you look at the pictures, it is hard to tell the difference. I like both of them, but I hate when companies make copies, it just shows a lack of creativity.

Galaxy is a mixture of a wine/plum and pink. It is an interesting color because it looks way lighter in the tube than it does on my lips. It was a surprise, but I really like it. I love a deep cranberry/wine color, and this delivers. It also have a bit of a sparkle to it which is always nice. Who doesn't love glitter!

Apocaliptic ( I love the name!) Is a beautiful pink/red color. It is bright and gorgeous. I love the mixture of red to pink and it has a bit of shift too it. Its pink in the sun and a bright red in the shade. I like that all of these lipsticks can be toned down depending on the amount you apply. You can easily dab a bit of this on your lips and create a subtle flush, or really go for it and make them lips pop!

Stellar is a super bright red/pink. It is similar to Apocaliptic but it is a lot more red than pink. Its definitely an in your face color, but I love it.


All of these colors are worth scooping up but my favorites are pretty clear. I love Celestial, Nova, Galaxy, Apocaliptic, and Stellar. You cannot beat the price and the formula is really nice. I wore all of these for a while, and the wear is average. Over an 8 hour period, I applied three times, which isn't awful but I feel like most people apply their lipstick that much anyway. I always apply initially, after I eat something, and then a few hours later or before I go out again or whatever. The tubes are not that huge so it won't take up that much room, and the pigmentation is so concentrated that you really don't need too much.

Check them out, and if you do, let me know what you think!

Have you used these? What do you think of them?

Until next time,

Sam
XO


Friday, February 21, 2014

Rag Doll Cosmetics Matte Lipsticks (Swatches & Review)

On Valentine's Day I stumbled upon this company called Rag Doll Cosmetics. They were having a 60% off sale so I decided it was the perfect time to try them. I am a certified lipstick hoarder, so before I try eye shadows/face products from a new company my go to to test if a company is bout it bout it is lipsticks. The lipsticks that I bought are all Matte.

SHOW ME THE GOODS

First impressions of the product is that the colors look super gorgeous, and the packaging is really cute and streamlined. I liked the feeling of the applicator in my hands, it's not too slim or chunky and you can get a good grip on it. 

TO THE SWATCHES BATMAN!!!!!!


I bought three matte lippies: Sexilicious, Raspberry Beret, and Malicious.

The first color is sexilicious. At first glance it looks like a super bright hott pink, which I love. It kind of reminds me of MAC's Candy Yum Yum just by first glance. On the lips it skips a bit. It isn't that creamy so it's a bit tough for me to apply it using the applicator. I applied it with a lip brush and it went on a lot easier. When I rub my lips together there is no drag, but not much moisture, which is to be expected with a matte formula. On my lips it looks more magenta than bright in yo face pink, so I was a bit let down as far as seeing the actual product and then noticing the difference on my lips. There is a faint cosmetic smell in the packaging but on your lips there is no smell or taste, which is good. I can't stand the crayon like smell of some cosmetics.

PRODUCT: 8/10
APPLICATION: 6/10
PIGMENTATION: 9/10
WEAR: 8/10
TEXTURE:6/10

The second color is raspberry beret. At first glance, this is the color that tugged at my heart strings the most. I am a sucker for a good deep red lipstick, and this definitely delivers. This formula is matte as well, but it is creamier than the former. I really liked the pigmentation and the way the lipstick applies. There was hardly any feathering or movement and it lasted for a really long time without a touch up. The smell situation is present in this one as well, but like I said above it does not have a smell or taste once applied. This color out of all three looks the most true to life, and I am quite smitten with it.

PRODUCT: 10/10
APPLICATION: 9/10
PIGMENTATION: 10/10
WEAR: 8/10
TEXTURE:9/10

The third and final color I purchased is called malicious. I kind of bought it for the name alone (I am such a sucker!). I have been in the market for a really pretty purple lipstick for a really long time and decided to give it a go. In the package this lipstick reminds me of MAC's heroine but on my lips it reminds me of a shadow from Urban Decay called Betrayal (from Vice 2). It has a bit of a shift to it, bouncing from a bright purple to blue and a smidge of red. In my swatch it sort of captured the color shift. Out of all three I can see that this is a lippie that needs to be built. One coat is not going to be enough to get the proper color payoff, or to get a payoff that is true to its color. It applied more opaque that I expected, but I actually liked the way it felt and looked after I had built the color up a little. It's definitely not my favorite of the three, but I don't hate it. I did notice that after about an hour it started to fade, but these swatches were taken without any primer or lip liner.

PRODUCT: 6/10
APPLICATION: 6/10
PIGMENTATION: 6/10
WEAR: 6/10
TEXTURE:6/10

All of these lipsticks can be viewed by clicking here 

They retail for 12$ each, and in my opinion are priced perfectly. They aren't outrageously expensive, or incredibly cheap. I definitely recommend that you check them out. There are currently 14 lipsticks on their line, as well as a full range of face and eye products. 

Until next time - Stay beautiful!


Wednesday, February 19, 2014

Concert Trial Looks: Purple/Blue Smokeout LOTD

As the title states, this is a look I did to test what kind of makeup I want to wear to the Miley Cyrus concert I'm going to in March. I'm going to be in Florida from the 27th of February til April 2nd hanging with my best friend and partner in crime, so I won't have much time between now and then to do sample looks with all the shenanigans we have planned. A girl's gotta be prepared right?

All eye shadows used are from Urban Decay's Vice 2


SHOW ME HOW YOU DO THE DAMN THANG....


LIDS
Prime yo lids
  1. Apply Voodoo to the lid, stopping just below the crease
  2. With a blending brush, blend out Voodoo with Madness 
  3. Accentuate the crease with Prank just on the outer portion of the crease
  4. Pat on Betrayal on the center of your lid for some definition
  5. Hi-light the tear duct using Shellshock

 EYES FACE LIPS
  1. Line and wing your eyes using Limecrime's black uniliner in Quill
  2. Apply Generous coats of Kat Von D Everlasting Mascara
  3. Apply Em Cosmetics Amethyst Purple liner to your waterline, then smudge it out for a smoky effect
  4. Fill in your brows with Anastasia Dip Brow
FACE
  1. Apply Amazonian Clay Airbrush Foundation 
  2. Using Nyx Full coverage concealer highlight under your eyes, the top of your forehead, bridge of your nose, cupids bow and underneath your cheek bones
  3. Apply Too Faced Chocolate Soleil Bronzer to the space between your under eye hilight and cheekbone hilight on both sides
  4. Apply bronzer to top of the forehead and temples, as well as jaw line
  5. While using a dabbing motion, blend your concealer, being careful to keep some of the edges defined
  6. Blend out bronzer well, but leave your cheeks defined
  7. Apply Tarte Amazonian Clay blush in Tipsy to the apples of your cheek, and merge it with your contour of your cheek bones
  8. Apply Anna Sui Mystic Rose Hilighter to all the places you placed concealer
  9. Set your face with Urban Decay Deslick
LIPS
  1. Prime lips with Primer
  2. Apply MAC Viva Glam Rihanna Gloss to lips
Done!

Girl you fierce :)

Do you think this looks like something you'd wear to a concert? Let me know what kind of makeup you would do in the comments!

XO

Samantha


Tuesday, February 4, 2014

Sex Vixen Valentine's Look

For every sweet woman, there is a sex vixen :) In order to represent Valentine's day fully, I had to do the opposite of anything sweet and classy. When I think of a sex vixen I picture sculpted cheek bones, dramatic eye makeup, and glossy full lips.

This is what I came up with...

EYES:

1. Prime eyes with Too Faced Shadow Insurance
2. Using a fluffy brush apply Dark Heart Designs e/s in St. Valentine to your lid, blending out towards the brow bone.
3. Starting from the inner crease working your way out apply Dark Heart Designs e/s in Charmed to your crease in a windshield wiper motion.
4. To accentuate the crease, wing out using Dark Heart Designs e/s Audrey. My best advice is to use tape to create a sharp edge, and a stiff angled brush to draw out the wing. 
5. Drag Audrey from the tail, along the lower lash line and into the tear duct.
6. Line your waterline with Urban Decay Perversion.
7. Apply mascara
8. Fill in brows using Anastasia Dip Brow Pomade

FACE:

1. Apply a primer to your face.
2. Apply Tarte's Amazonian Clay Liquid Foundation.
3. Hilight under your eyes, cupids bow, and forehead with Anna Sui Mystic Rose.
4. Using Too Faced Chocolate bronzer, sculpt out your cheek bones, or fake them like me
5. For the blush use Nars Orgasm

LIPS:

1. Prime your lips using Too Faced Lip Primer - You don't want your lipstick to feather or move
2. Apply Mac Viva Glam Rihanna to the middle portion of your lips
3. Apply Mac Rebel to the outer portion of your lips
4. Apply Mac Oversexed lip gloss over your entire lips


Practice your sex kitten growl

Inner Confidence + Red Lips = Your man won't know what hit em'

Until next time

XO

Like me on Facebook: https://www.facebook.com/24karatdime
Follow me on Instagram: http://instagram.com/24karatdime


Sunday, February 2, 2014

Sweetheart Valentine's Day Look

In February, not much happens except for Valentines Day, and for many this means one of three things; you care, you don't, or you despise it. For singles Valentines Day is usually celebrated in a group setting by setting your ex boyfriends stuff on fire, getting drunk, and confessing your love of your single lifestyle. Or downing a container of chunky monkey alone while you cry and watch The Notebook. If you are with someone, your boyfriend/girlfriend are usually under so much pressure to get you the right gift, or cook you the right dinner, or make the right reservation that they don't even remember what they are supposed to be celebrating. Then there are those that absolutely despise the holiday and go all out to tell anyone who has ears how much they hate it. No matter what your situation, Valentines Day is a day to celebrate love, regardless of where it comes from. It could be your cat or dog who waits for you to come home everyday, or your family, or even your friends. It's not a holiday strictly for lovers, or those in love, it's for anyone who loves someone.

I wanted to do three different looks: a sweetheart, a sex vixen, and an anti V-day. I think it's important to represent those who want to look sweet, those that want to feel and look sexy, and those that are opposed all together. No matter where you fit in, I've got a look for you!

First up, the sweetheart!


When I think of sweetness makeup wise, I think natural, neutral tones, simple lips and pink cheeks. Let's get started :)

EYES
1. Start by applying your favorite eye shadow primer to both lids
2. Using a nude shadow sweep this all over the lid, apply this color heavier on the inner corner of the eye.
3. Using a champagne colored shadow, apply this from the outer portion of your eye to two thirds inward. Blend #2 shadow and #3 shadow together lightly, making sure to keep a good pop on the inner corner.
4. Apply a light bronze shadow to the outer half of your eye, working in a V shape.
5. To strengthen the crease, apply a gold shadow to the V shape and blend the colors together. Apply the same gold shadow to the lower lash line.

FACE
1. Using Anastasia Dip Brow Pomade in Blonde, fill in your brows.
2. Apply Mascara (I used Bad Gal Lash by Benefit)
3. Apply foundation (I used Tarte Amazonian Clay Airbrush Foundation)
4. In the hollows of your cheek apply bronzer (NARS Laguna)
5. Above your bronzer, apply pink blush working towards the apples of your cheeks (NARS Angelika)
6. Under your eyes, bridge of your nose, middle of your forehead and cupids bow apply your favorite highlighter (Anna Sui Mystic Rose)
LIPS

1. Apply your favorite neutral pink gloss (NARS Super Orgasm)


Twirl your hair + Bat your lashes + Smize = Sugary sweet


*If you're not the "sweet" type or plan on sexing it up for Valentine's Day, stay tuned, I got you!*

XOXO


Monday, January 13, 2014

Adventure Time Series: Princess Bubblegum

What time is it???? Well, if you guessed the theme, have kids, or are actually a fan you would know that the answer is always going to be ADVENTURE TIME!

I am a relatively new fan of AT. My young cousins who are 6 and 8 are obsessed with it, and while I was staying at their house over the holidays thats all we watched. After a while I found myself watching it without them, and then also found myself downloading seasons so I could fit in with all their references to certain episodes... for example...

I had no idea what they were talking about, but now I do, and quite frankly it's hilarious! So, now that I am on Season 5, and I kind of feel like I know the characters that make up AT, what better way to bring them to life than to do makeup looks inspired by my favorite characters.

Princess Bubblegum is one of my favorites on the show firstly because she is a princess and rules a place called Candy Kingdom, second because she is made of bubblegum, and third because she is a scientist and extremely smart. Being a princess, and also being comprised of bubblegum, makes it pretty easy to pick a color palette: ALL PINK ERRYTHANG!


Yay Princess Bubblegum!!! Now, this photo is obviously edited like crazy, sadly, I DO NOT live in the Candy Kingdom, have pink hair, or violet eyes (sigh), but it does represent the Princess pretty well if I do say so myself :) 

If you're asking how I did my makeup, look no further!


I first moisturized and primed the hell out of my face. PB's complexion is absolutely flawless (cartoons always have amazing skin) so to emulate that I need as much help as I can get. I used Kat Von D's lock it tattoo foundation for this look because its extremely heavy and full coverage. I then went over it with Tarte's Amazonian Clay Powder Foundation to set everything nicely. To highlight my face, and make it appear even more flawless I used Dark Heart Designs Seeing Stars under my eyes, on my forehead, my cupids bow, and my brow bone. I then contoured my nose using Em cosmetics by Michelle Phan's chiaroscuro contour/highlight stick. I did not apply bronzer because PB has a pinky complexion and is not tan in any way lol Next step was blush, and I used NYX rouge cream blush in glow and applied it liberally to the cheeks. Any pink blush will do!

For the eyes I started by priming them with Too faced shadow insurance. I then applied Dark Heart Designs e/s in Beautiful Nightmare to the lid. In the crease I used the pink color from the Limecrime D'Antoinette palette, and then blended it out with Sugarpill's dollipop. For the inner corner, I used Dark Heart Designs e/s in Bonedaddy to give the inner corners of my eyes some sparkle, and to highlight my eyes. The brows are a mixture of the Limecrime pink and Sugarpills Poison plum. The lower lash line is lined using Royal Amethyst Waterliner from Em Cosmetics. I then applied mascara, and called the eyes DONE!

Lips are Limecrime's Great Pink Planet

I want to make this a series, so any suggestions would be great! Who is your favorite character?

Until next time.. Cheeeeeckkkk Pleeeeaassseeeee


Thursday, January 9, 2014

Beauty Blogger's First Cut Crease

I almost had the title say baby's first cut crease because there are moments when doing makeup where I feel like an infant. I definitely think I have improved in the year that I've gotten serious about learning how to do makeup, but a cut crease to me is advanced, so, so advanced. I am not the best with liner. I can line my eyes, and I have just recently learned how to wing my eyes without ending up looking like a panda, but that cut crease tho? Yep, needs work. When I think of cut creases, I think of Queen of Blending. It takes impeccable blending skills and artistry to firstly get the correct shape for your face, and secondly to blend the shadow correctly without it looking cray. I wanted to share this because I will use it as a template to gauge my improvement. I have to remember that the best artists have off days, therefore when you are seeing these gorgeous makeup looks its most often one picture out of 100 or more. I know when I do a look my iPhone is full of rejects, and I usually only find 2-3 that I feel pass. We are our own worst critics, but sometimes you have an off day, and that's OK. I am still in the beginning stages with makeup, and this is my first attempt at something I feel is incredibly difficult. I'm ballsy like that. This will not only serve as my oh my god I can't believe how awful I was moment in the future, but it may help someone. Technically, I did a cut crease, so it still has a tutorial factor, and it may benefit someone in some way, if only to get a laugh lol.

I primed my eyes with Too Faced Shadow Insurance, and took my handy Jessie's girl black liquid liner pen and made an outline of the shape that I was going for. I should've kept the tail shorter, or made no tail at all, but c'est la vie. When doing this, don't worry so much about the lines, just make sure its in a shape. It doesn't have to be perfect, as you can see I did screw up the line a bit lol. Next, I took Kat Von D's autograph pencil liner and traced over my line, making it thicker and more defined. Yes, there is still mistakes. Next, using Urban Decay Naked 3's e/s in Blackheart I traced the line, and then started to drag it upwards, and following along the line. After you have a good bit of color on your crease line, grab your favorite blending brush and blend side to side and upwards in a window wiper like motion. That is how I did it. I know it's not technically right, or perfect, but for my first time- not too shabby.

Now to finish off the look, I patted on e/s from my new Naked 3 palette, and those were Nooner on the lid first, and then Dust on top to set it and give it a little shimmer. In the tear duct as well as half of the lower lash line I used Trick. The other half of the lash line is the same black shimmer color we used in the crease called Black heart. Apply mascara, and you are done with the eyes, finally!

For the face I used Tarte's Amazonian Airbrush Foundation, and their blush in Honored for the cheeks. Concealer is the great cover up by em cosmetics, and the contour on the nose and face was done with em cosmetics chiaroscuro contour stick.The lips are J cat's red lip pencil with benefit life on the A-list gloss on top.

There you have it! I actually really like this look, although the cut crease needs some work. With practice, maybe, one day I can achieve the skills of the Queen :)

Hope you took something away from this, and thanks for reading!

XO


Tuesday, January 7, 2014

Naked 3 Review & Swatch Fest

I feel like I've arrived WAY late to this party, but yay Naked 3 is out! I purposefully didn't buy this item when it first came out because I wanted to see if anyone would get it for me for Christmas... and they did: that person is my best friend, Alexis (thanks, boo!). Everyone who knows me knows I live for Urban Decay products. Urban Decay is not only cruelty free, but all of their products are worth their price tag. They last, are made of the highest quality ingredients, are easy to use, and feel like butter. I own quite a bit of UD products, and I can honestly say that there isn't anything they've put out that I didn't absolutely love and have to buy.
There is a bit of a cult following with the Naked products. I have drank the kool-aid and can attest that yes, there is a cult, and yes you should be in it. The original Naked palette is my beauty go to, and I take it with me on every trip, and use colors from it for EVERY makeup look I do. Naked three focuses on rose toned neutrals, which for anyone who doesn't live under a rock, knows that it was a very smart decision because rose tones are trendy right now in fashion. Rose toned errythang!

I had the Naked 2, but I never used it because I fell so deeply in love with the Naked palette, and I never replaced it once I used it all up because it just didn't click with me. This one, I wanted not because I am overly thrilled with rose toned, but because UD is awesome and I am a hoarder.


At first glance the colors look gorgeous. It reminds me a lot of the Naked palette but just more pink (duh!). When you dip your tips into these shadows, the consistency doesn't disappoint either; they feel like velvet and glide on your skin like butter.

Shadows from Left to Right: Strange, Dust, Burnout, Limit, Buzz, Trick, Nooner, Liar, Factory, Mugshot, Darkside & Blackheart

The lighter colors were a bit of a disappointment to me. They swatched horribly, which is odd for UD shadows. Usually they are so deeply pigmented that you have to use soap to get them off of your skin. Keep in mind that this swatch is WITHOUT any primer or JEP. I have used all of these shadows, and although I LOVE the pinks/lighter colors, I still prefer my original Naked palette (I'll never leave u darling!) The darker, richer colors of this palette are amazing, and what you have grown to expect from Urban Decay. The last color, Blackheart is a deep black with flecks of rose toned glitter. It is absolutely gorgeous, and It is my new favorite black shimmer. At first glance, the second and third colors were my favorite, but they are a bit cakey and powdery. They have a lot of shimmer to them, so the fall out is terrible, but the color IS pretty.

Overall, I really like the palette, and I will use it, but I am unsure if it will be a "forever" palette like my beloved original Naked palette.

Naked 3 is available at Ulta, Urbandecay.com, beautylish, macys, sephora, and pretty much anywhere luxury brands are carried. Retail price is $52.00

What's your favorite Urban Decay product? Let me know!


Monday, January 6, 2014

Tranquility

The holidays are over (for now), so I figured this would be the best time to focus on relaxation. I didn't relax much over my break (yeah, I know I am weird). Instead, I spent all my time entertaining children, and worrying about everything lol. I don't care who you are, Christmas is stressful. Then there's new years, and you have no idea where your going, what you're going to wear, or what your makeup is going to look like. My first makeup look of 2014 is all about tranquility, and what is more tranquil than a beach? Seriously, it's like 30 degrees here right now (which is warm for a lot of the world, I know, I shouldn't complain!), but I am friggin freezing.


To get the full details on how I created this look, keep reading!

FACE:
For the face I kept it easy peasy sense my skin is dry (stupid winter!), and I don't think being tranquil means piling on foundation. The foundation I used was Tarte's Airbrush Amazonian Clay Airbrush Foundation. I then used Tarte's blush in the shade honored to give my cheeks a little life.
EYES:
I primed my eyes with Too Faced Shadow Insurance and then applied Dark Heart Designs shadow Rag Doll to the lid, stopping halfway up. In the inner corner, blending out towards the Rag Doll shade, I applied  DHD e/s in Frost to highlight my eyes. In the crease I dabbed on DHD e/s in Ultraviolet, and blended it towards the center of the lid and upwards. I continued adding Ultraviolet and blending until I was happy with the gradation. After I had my shadow the way I like it, I took a smaller detail brush and applied Ultraviolet to the lower lash line. I then took a matte black shadow and carefully lined my upper lash line, staying as close to the lashes as possible. I then curled my lashes, and applied mascara liberally. I used Rimmell's glam eyes mascara in black for this look.

Are you relaxed yet?

I love doing makeup because it allows me to be creative, but also relaxes me. I put in my headphones, pick up a brush and begin to paint. I encourage you all to sort of de frag your brain in any way that you can. Take time for you!

Check out Dark Heart Designs!! Their products are insanely good!! http://darkheartdesigns.storenvy.com/

Thanks for sticking by me, I hope you like this look, and as always if there's anything you would like to see, I love a challenge, so let me know!